
The Raya long ball
The methodology we use when David Raya goes long in specific situations

Long balls are back in fashion. Direct play, with emphasis on collecting loose balls, has become a prevalent sequence that teams utilise. It personifies tactical homogeneity.
We use long balls frequently. It’s an avenue explored when superiority can be established. Superiority in the sense of long balls to isolate our wingers 1v1 after provoking the ball side central midfielder or centre back (CB) to jump forward, long balls to threaten the last line when faced with a full court press, long balls to find blindside runs, etc.
David Raya has taken us to a new level in this aspect. Some of his qualities, specifically in dictating build-up, weren’t necessarily apparent before arriving in North London because he’s never been surrounded by an environment that prioritises short passing patterns under pressure. However, his ability to accurately ping balls over the top has always been conspicuous. That Raya to Ivan Toney connection was mightily effective. We have firsthand experience of this.
We’ve been able to achieve a similar level of effectiveness with Kai Havertz here. Raya to Havertz is a great tool in our Arsenal (hehe). And following the signing of Mikel Merino in the summer 2024 market, we have another reliable direct link from back to front.
So with all of this verbiage in mind, the focus of this piece is to assess long balls via Raya from either kick-offs or from fouls that we have won near our own goal.
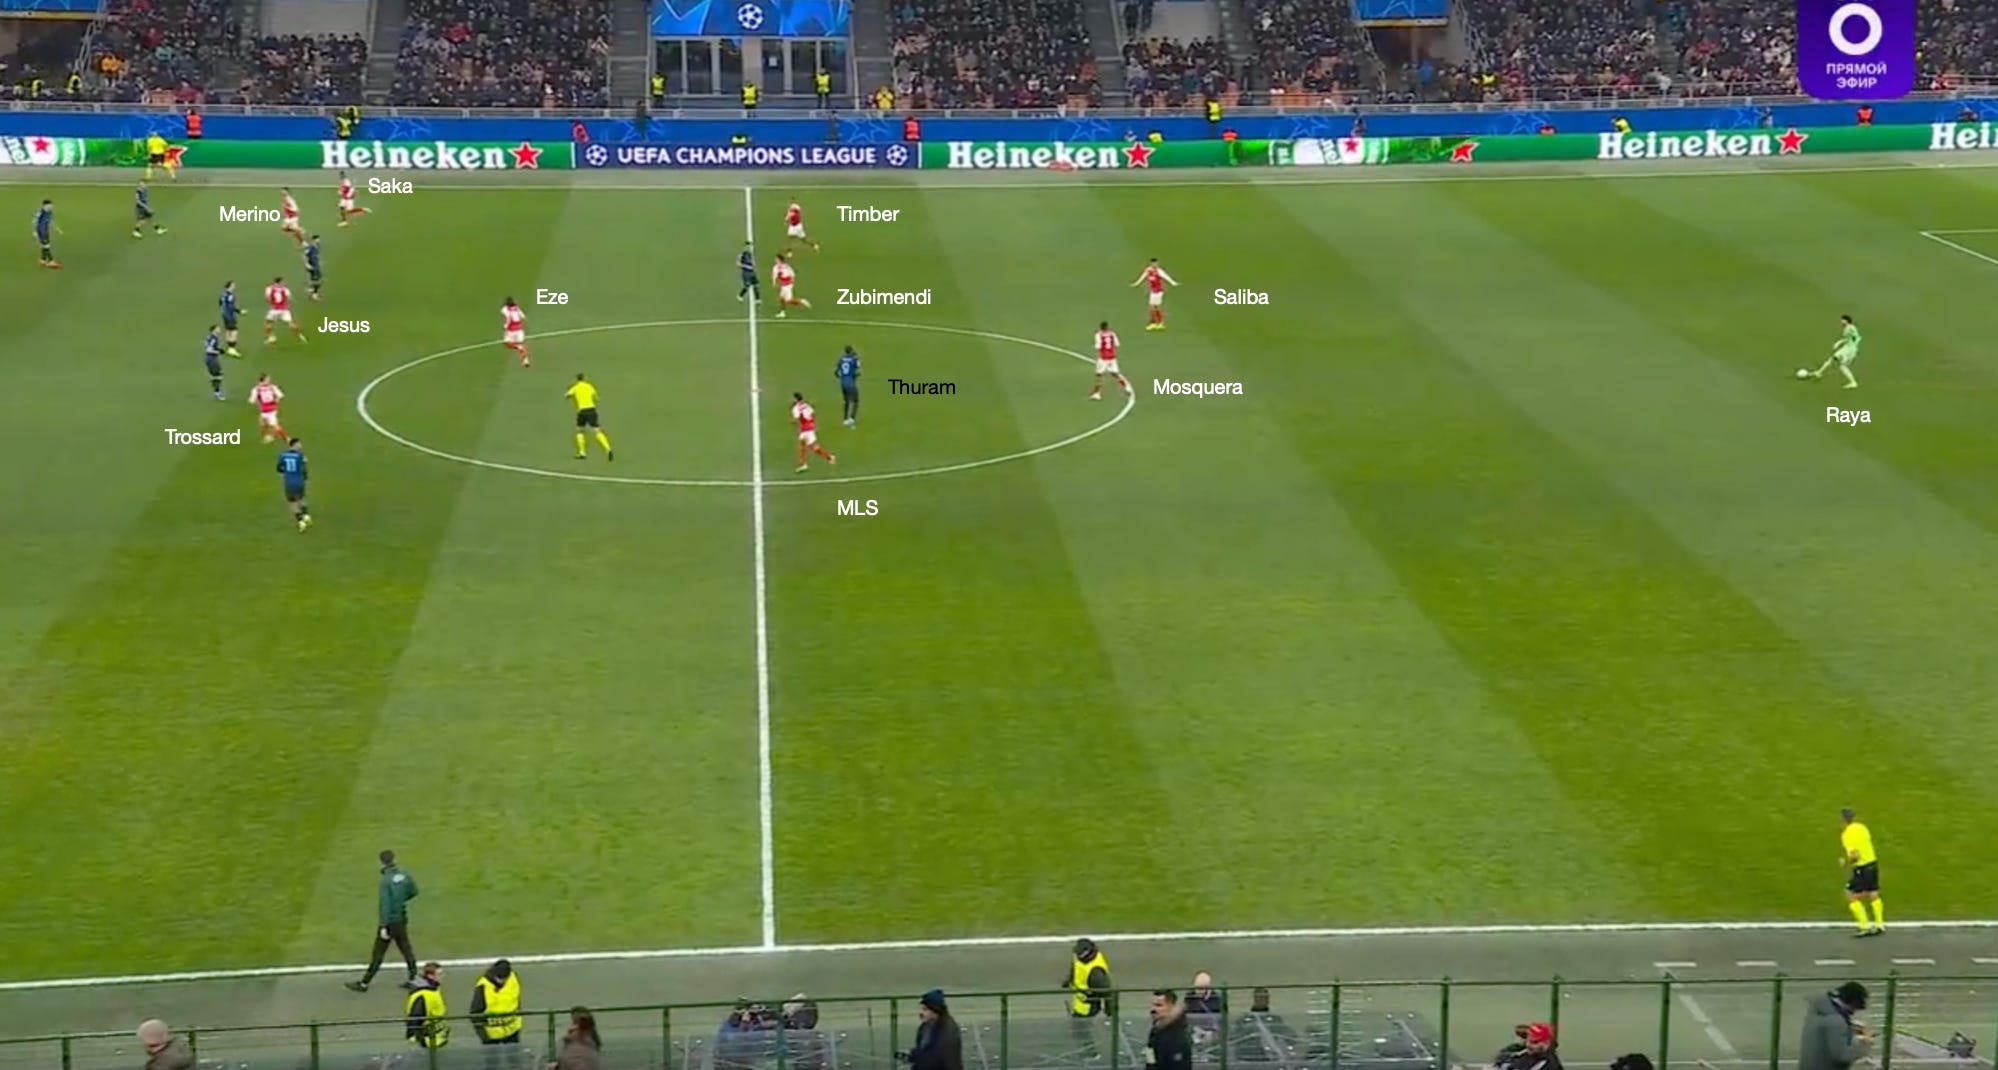
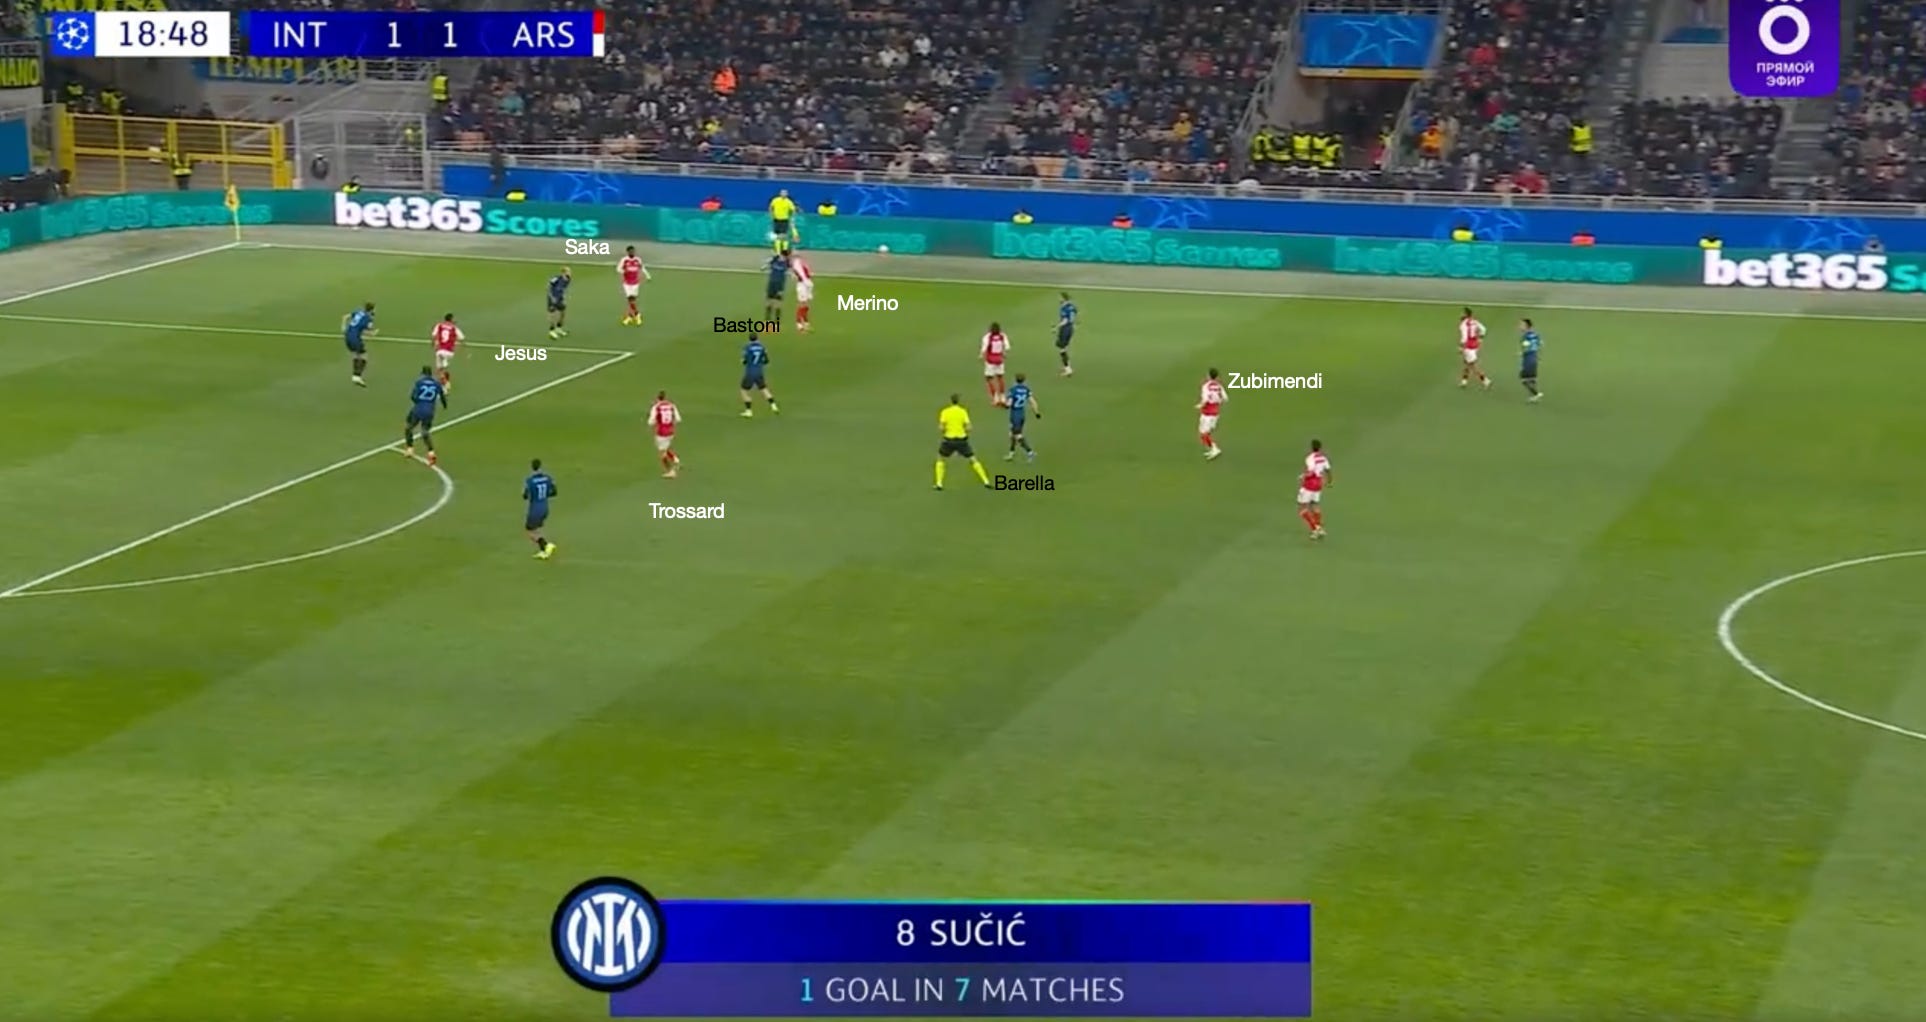
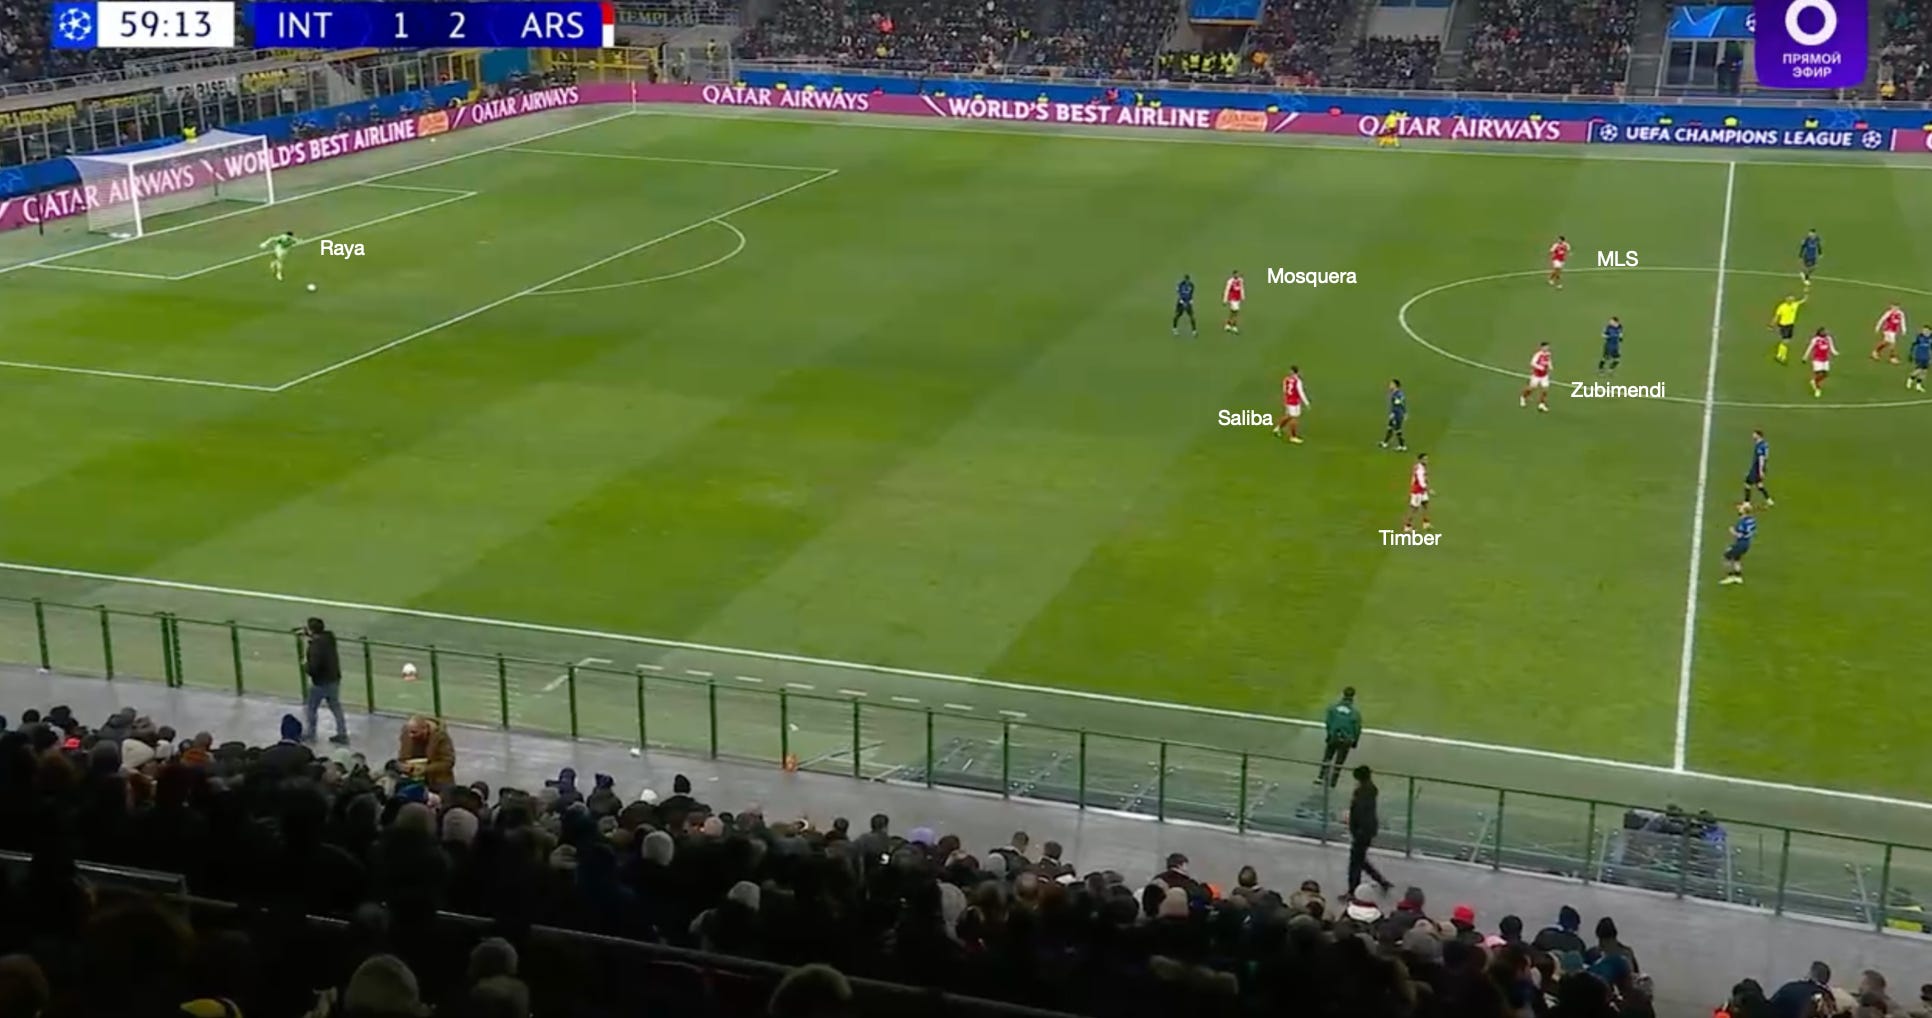
Take a look at the sequence from kick-off against Inter Milan, shown below. The ball is played back to Raya, and he hits it long towards the right channel. These passes are delivered into the flanks because the touchline acts as an extra defender, and it’s much easier to squeeze the pitch, control potential transitions, and even if a throw-in is conceded, we are in a strong position to apply pressure on the ball.
The structure we consistently use is a nominal 2-3-5/3-2-5 setup. Our two CBs, William Saliba and Cristhian Mosquera, are marking the centre forward (CF), Marcus Thuram, with Jurrien Timber, Martin Zubimendi and Myles Lewis-Skelly ready to pressure the second ball against their designated marker. This is a very stable rest defence shape as it provides sufficient central coverage.
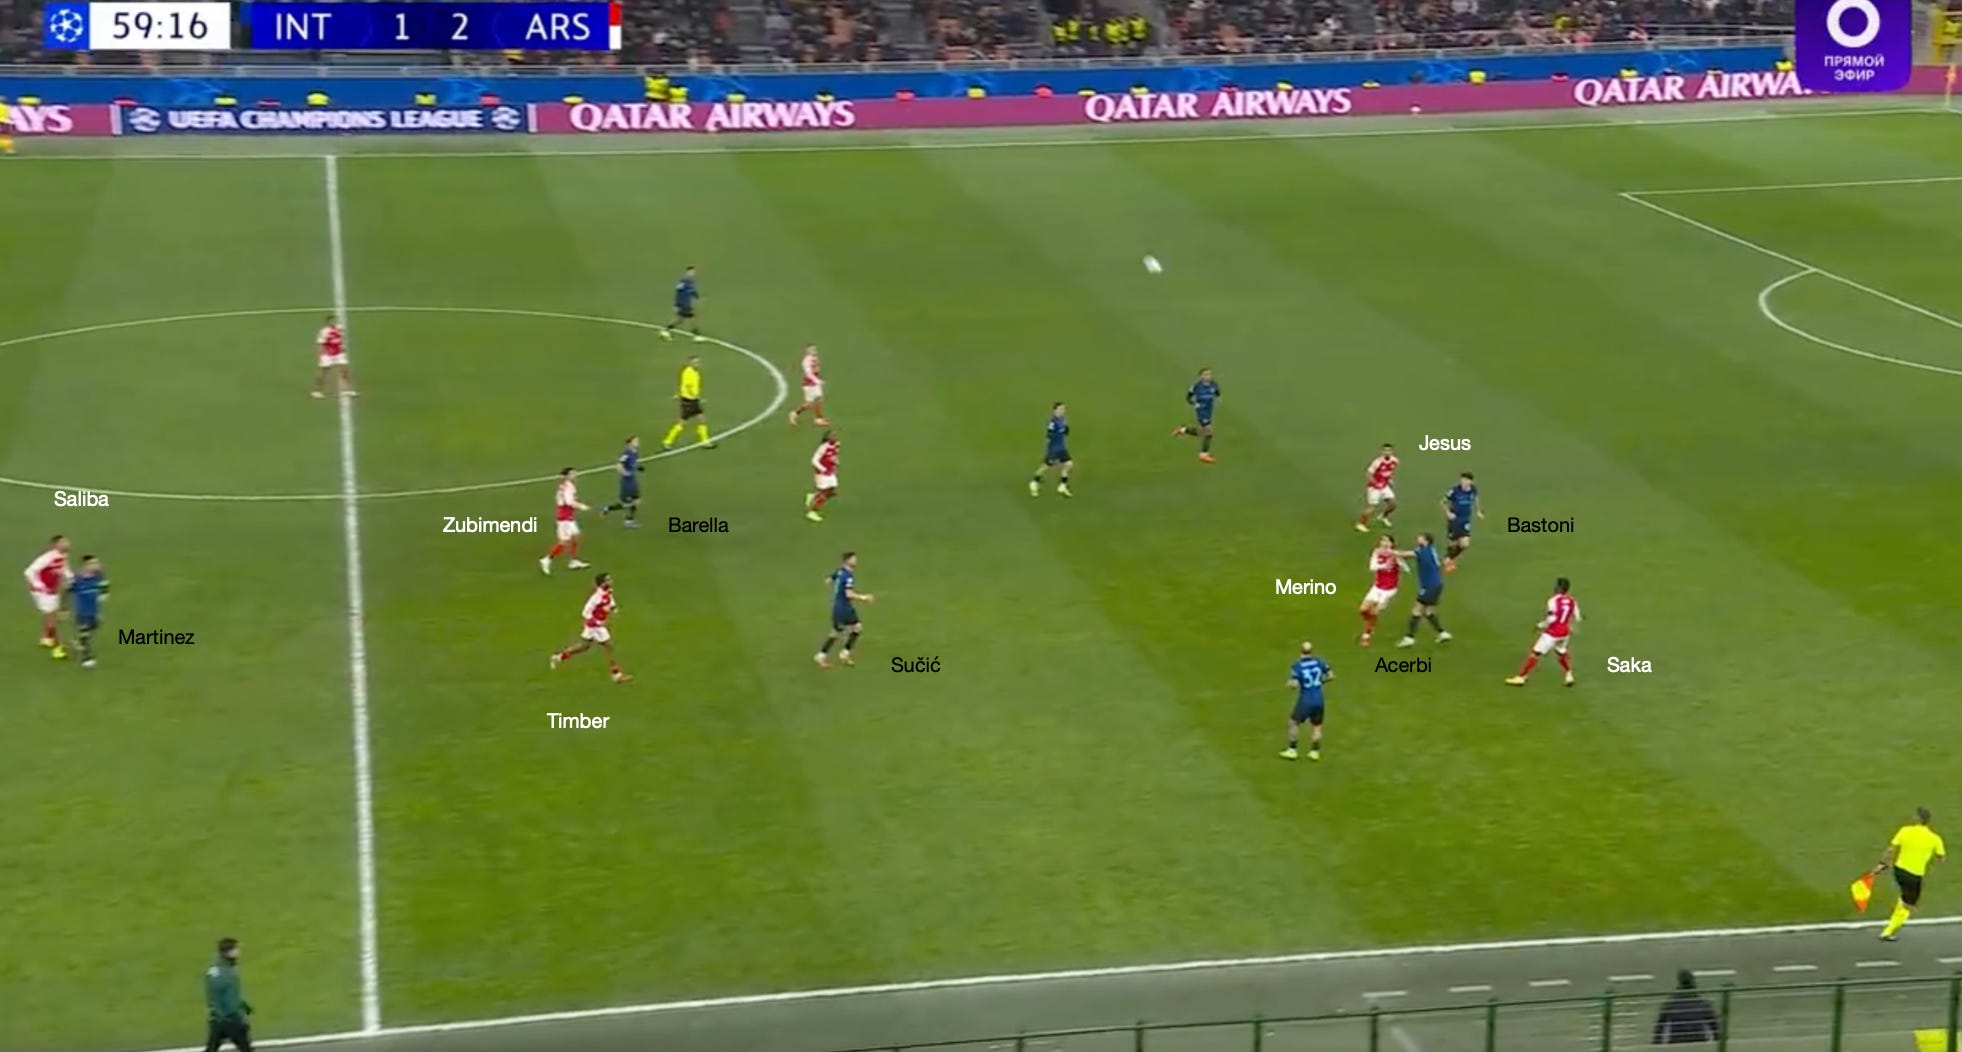
Merino is the target, who is excellent at winning the first contact, which is why you can see Gabriel Jesus and Bukayo Saka anticipating the flick on by positioning themselves ahead of the Spaniard.
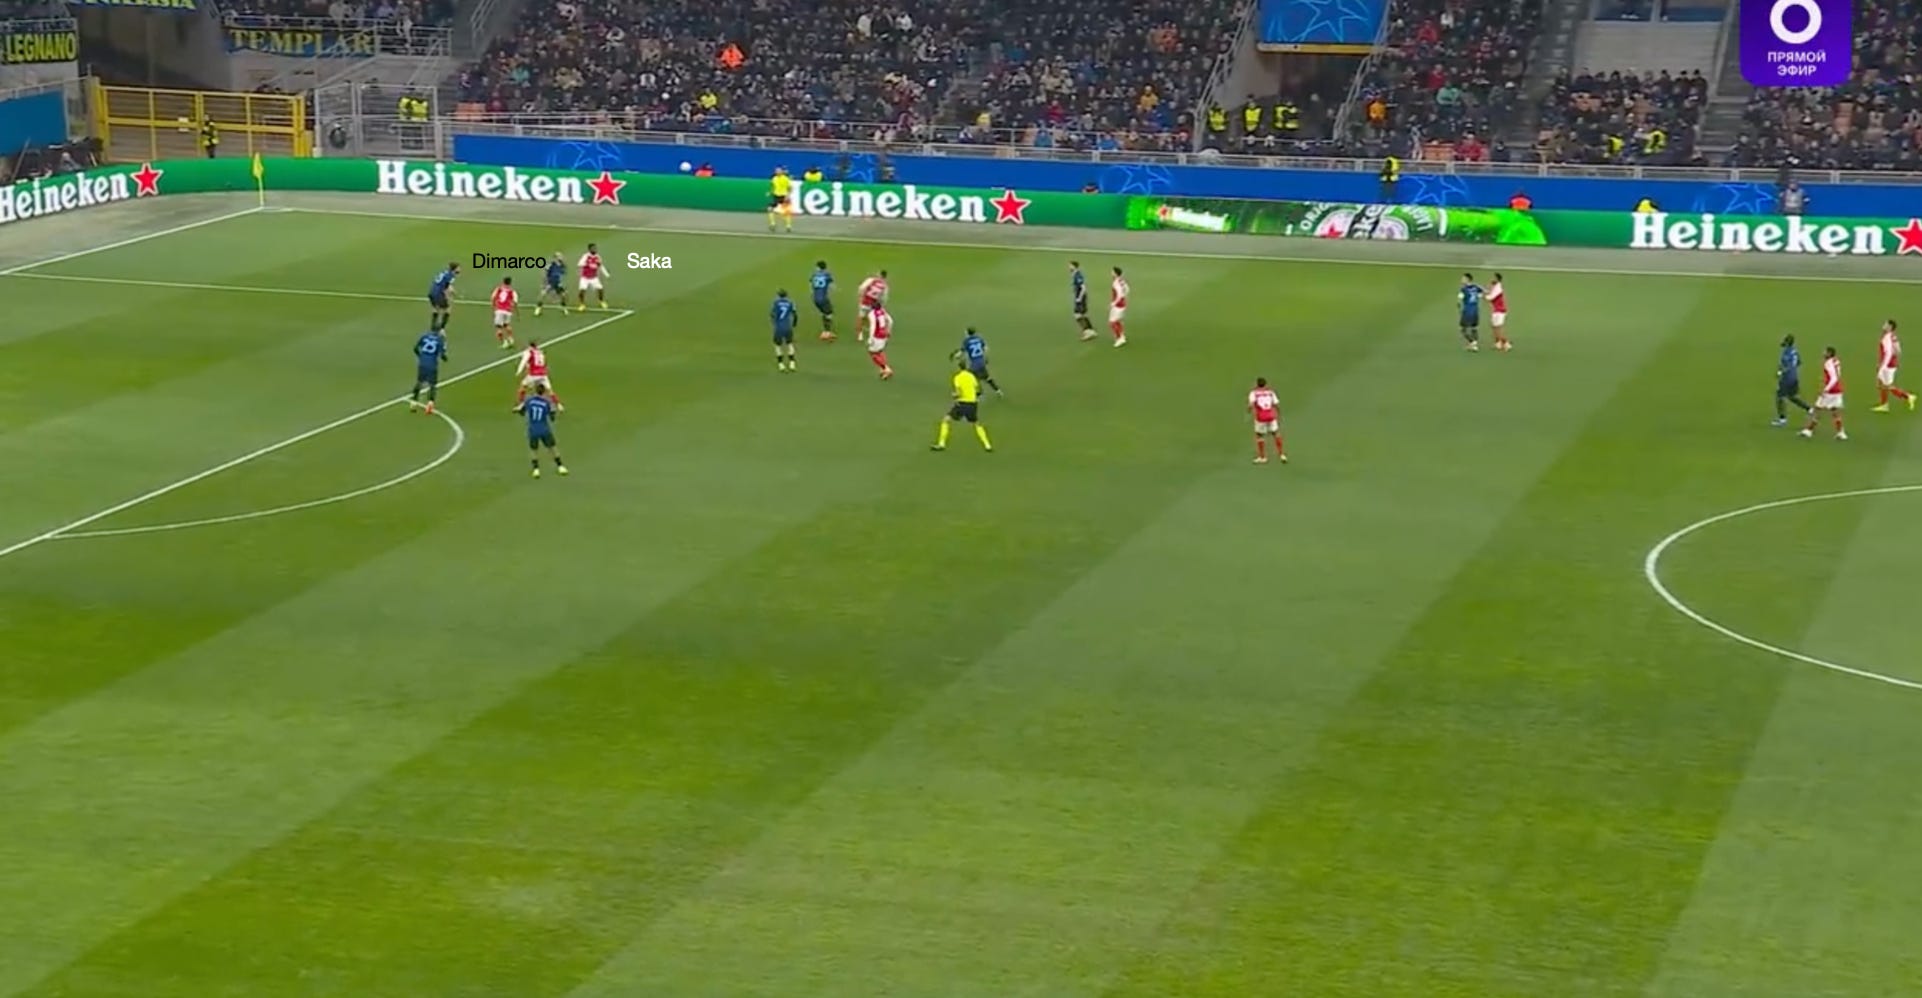
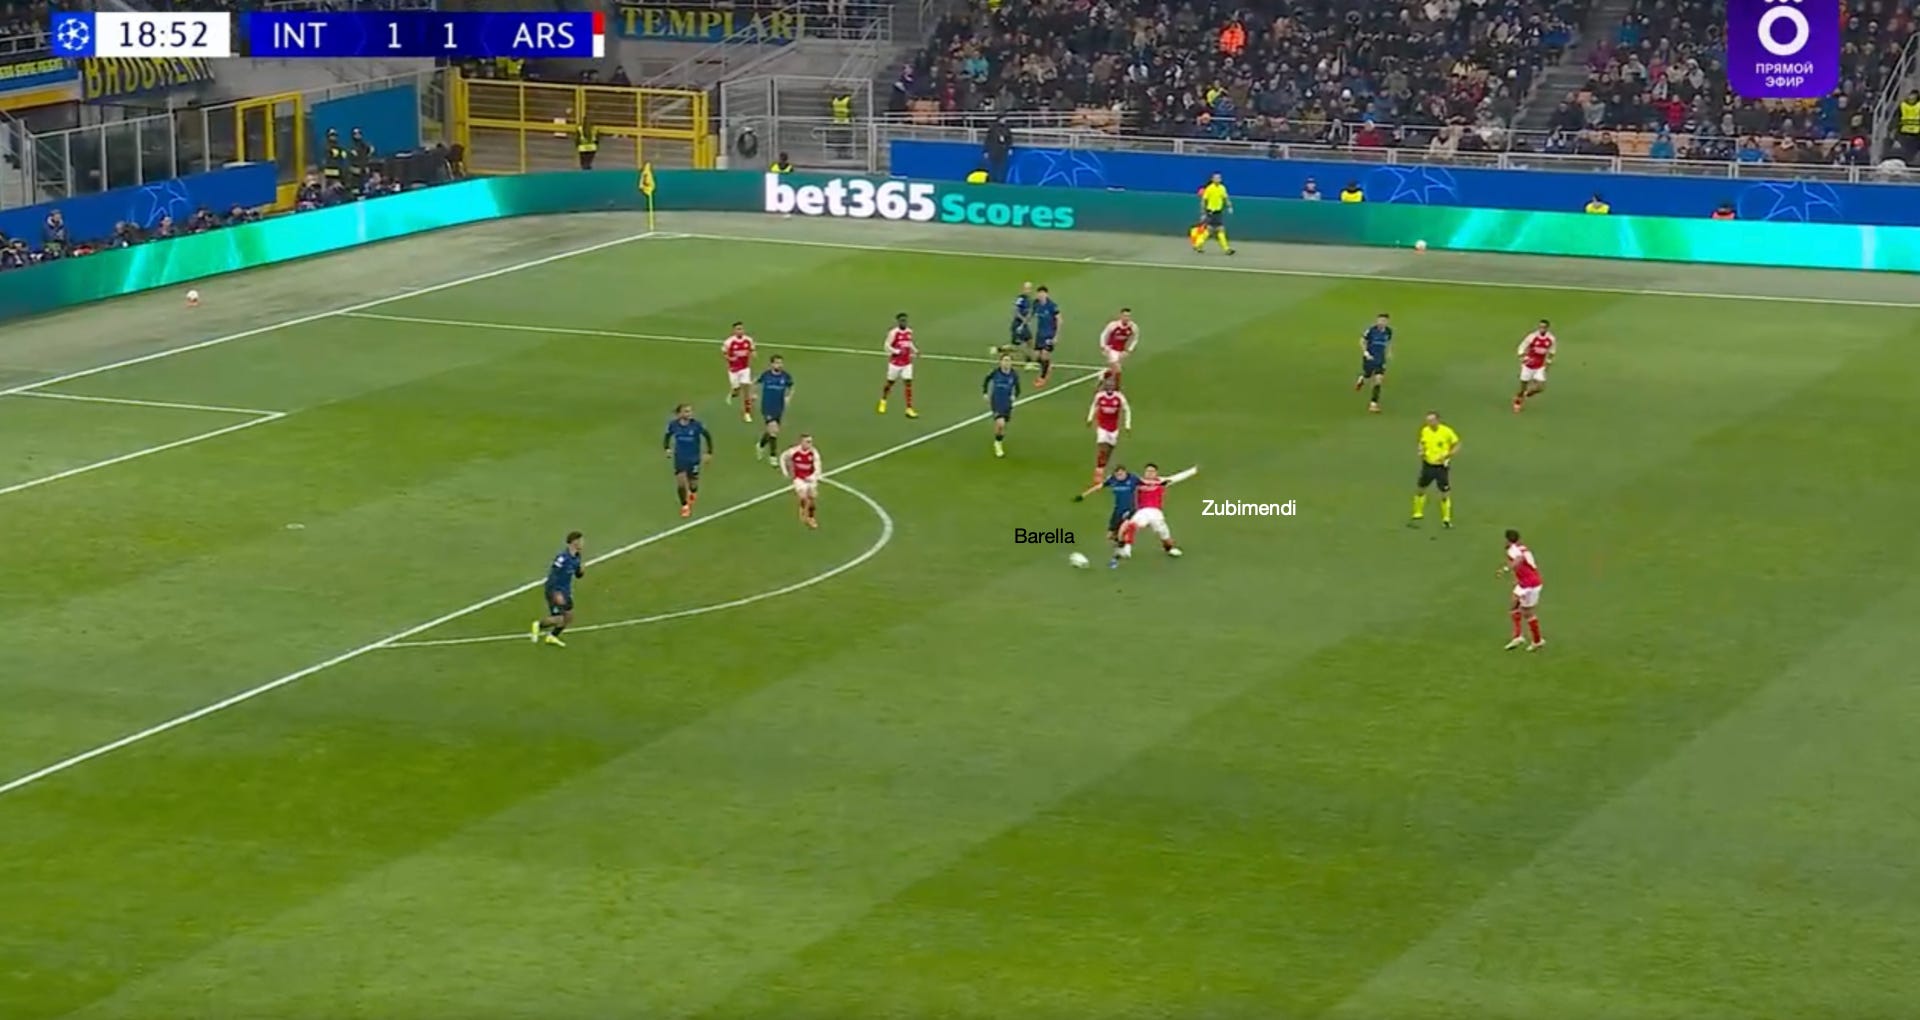
Merino wins the flick on, directing it to Saka, who wins the exchange against Federico Dimarco. Loose balls all over the gaff here, but we do well to keep it alive following a couple of additional exchanges that involve Leandro Trossard and Eberechi Eze, before Lewis-Skelly latches onto the final loose ball, but his shot is blocked.
It’s pure and utter carnage, courtesy of a simple, direct ball delivered with top precision by Raya, which allows the scrap to commence. Naturally, the opposition sinks deeper and deeper the closer they are to their goal, which opens up opportunities for shots on site, either inside or just outside the box.

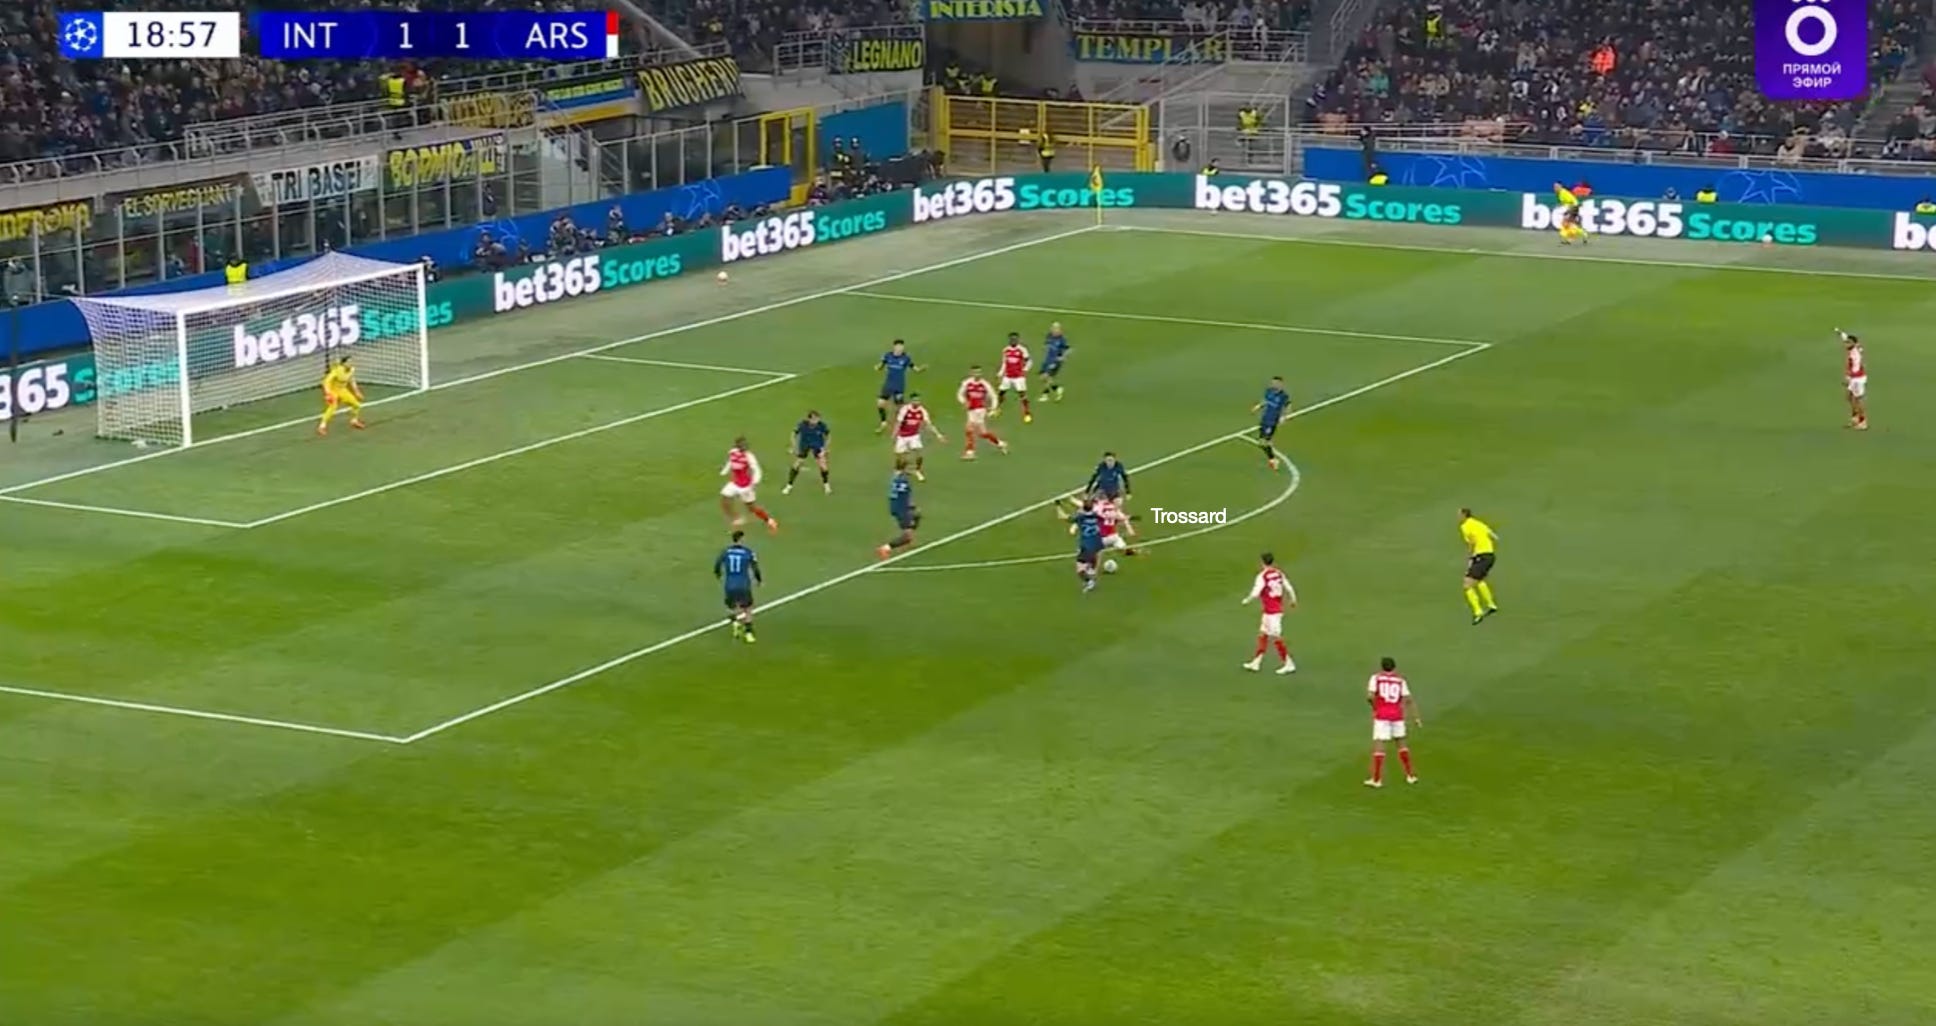
Let’s look at another example, shown below. Same idea, looking to find Merino immediately and a familiar structure on show. Merino this time doesn’t win the initial contact against Alessandro Bastoni, who, under noteworthy strain, attempts to direct the ball towards Nicolò Barella. Now this is where the men behind the ball come into play. Look at Zubimendi’s positioning, behind Barella. This is very important to highlight because this allows Arsenal’s number 36 to have eyes on both the ball and Barella, whereas the talented Inter midfielder can’t simultaneously keep tabs on both Zubimendi and the ball. And this is further compounded by the fact that he’s trying to deal with a bouncing ball. In layman’s terms, Zubimendi has a clear advantage against his marker because he has less to process. His job is simple since everything is in front of him.
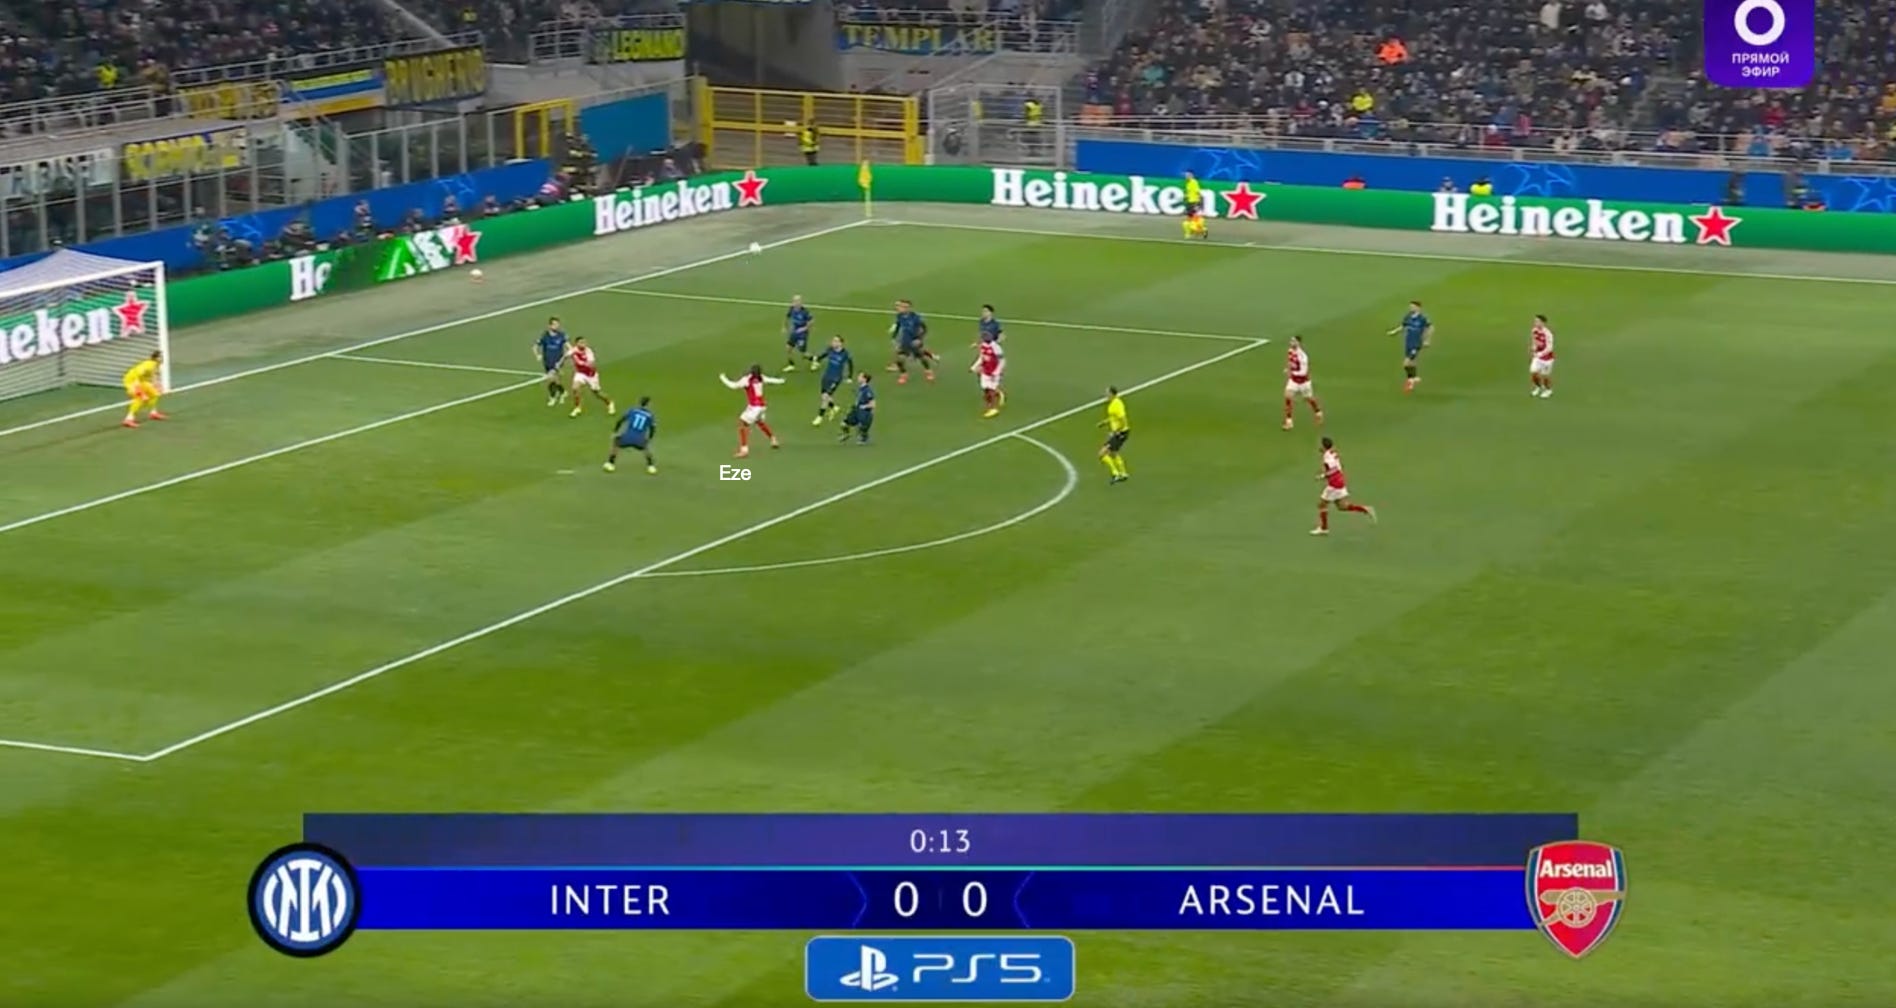
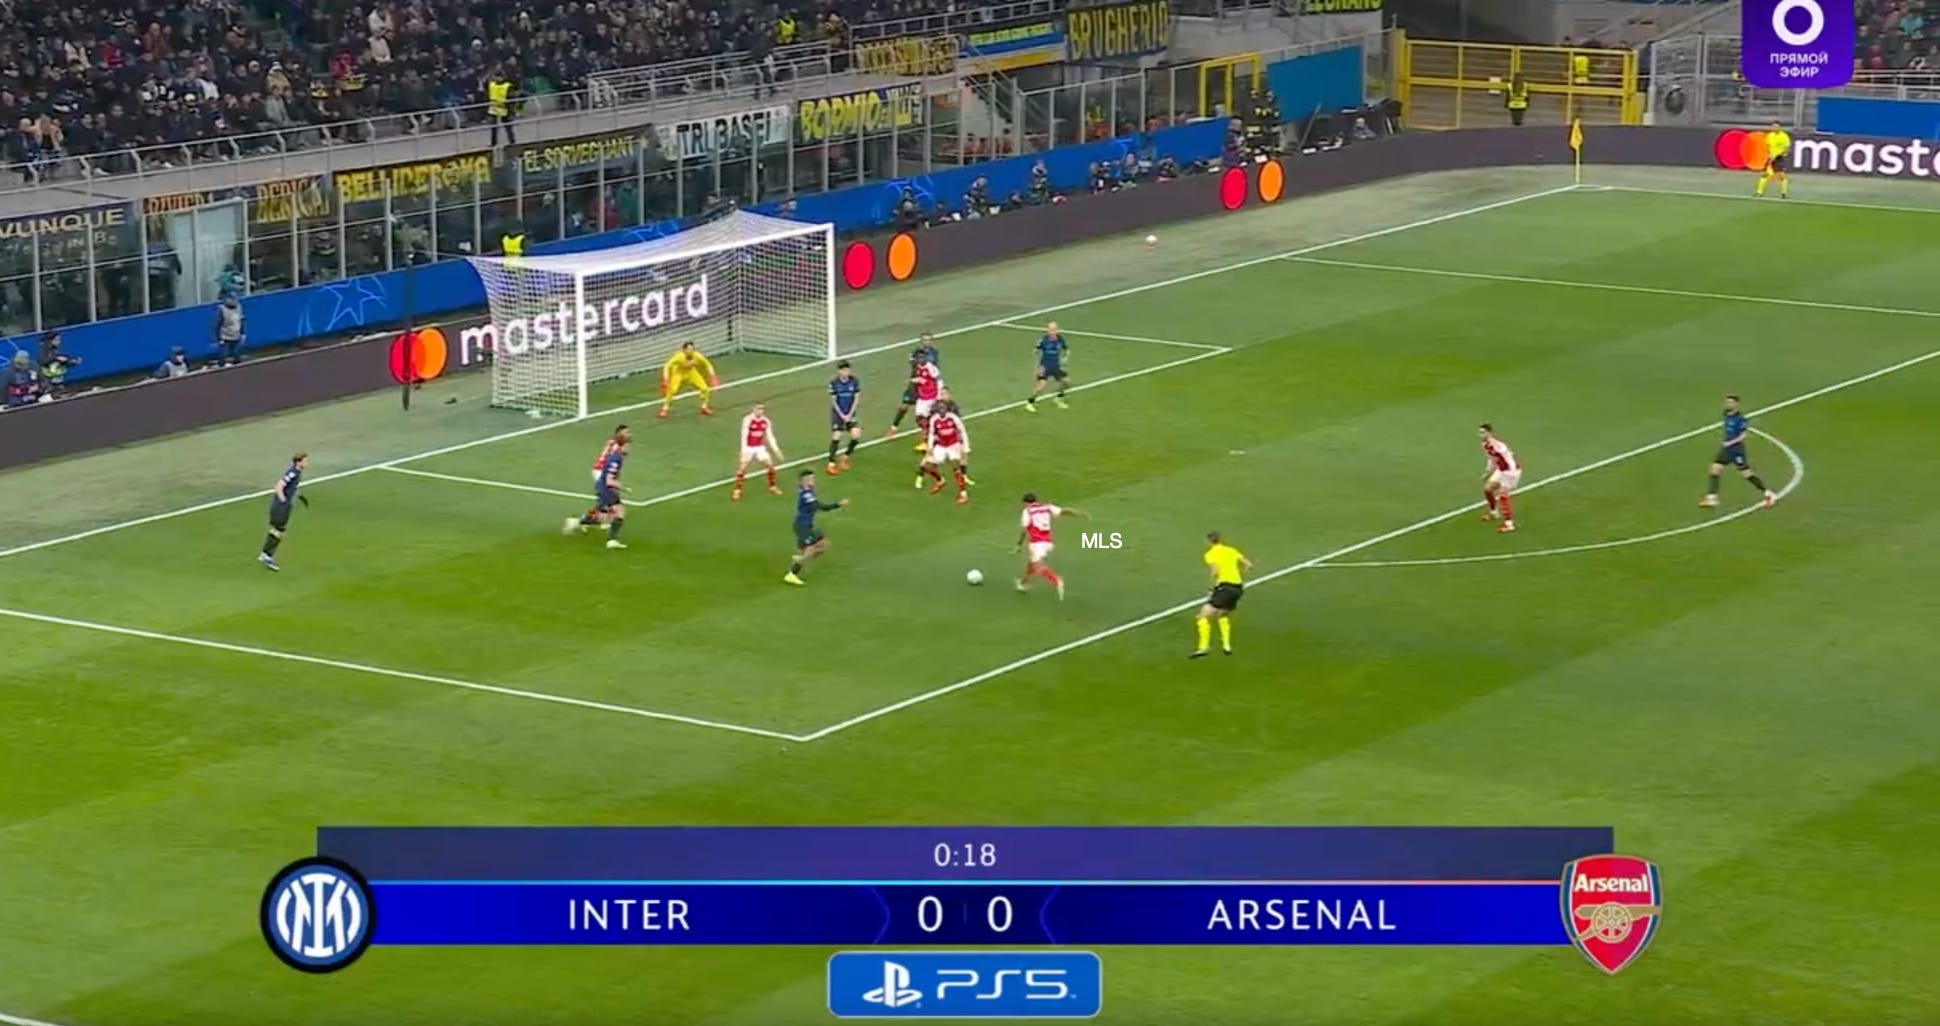
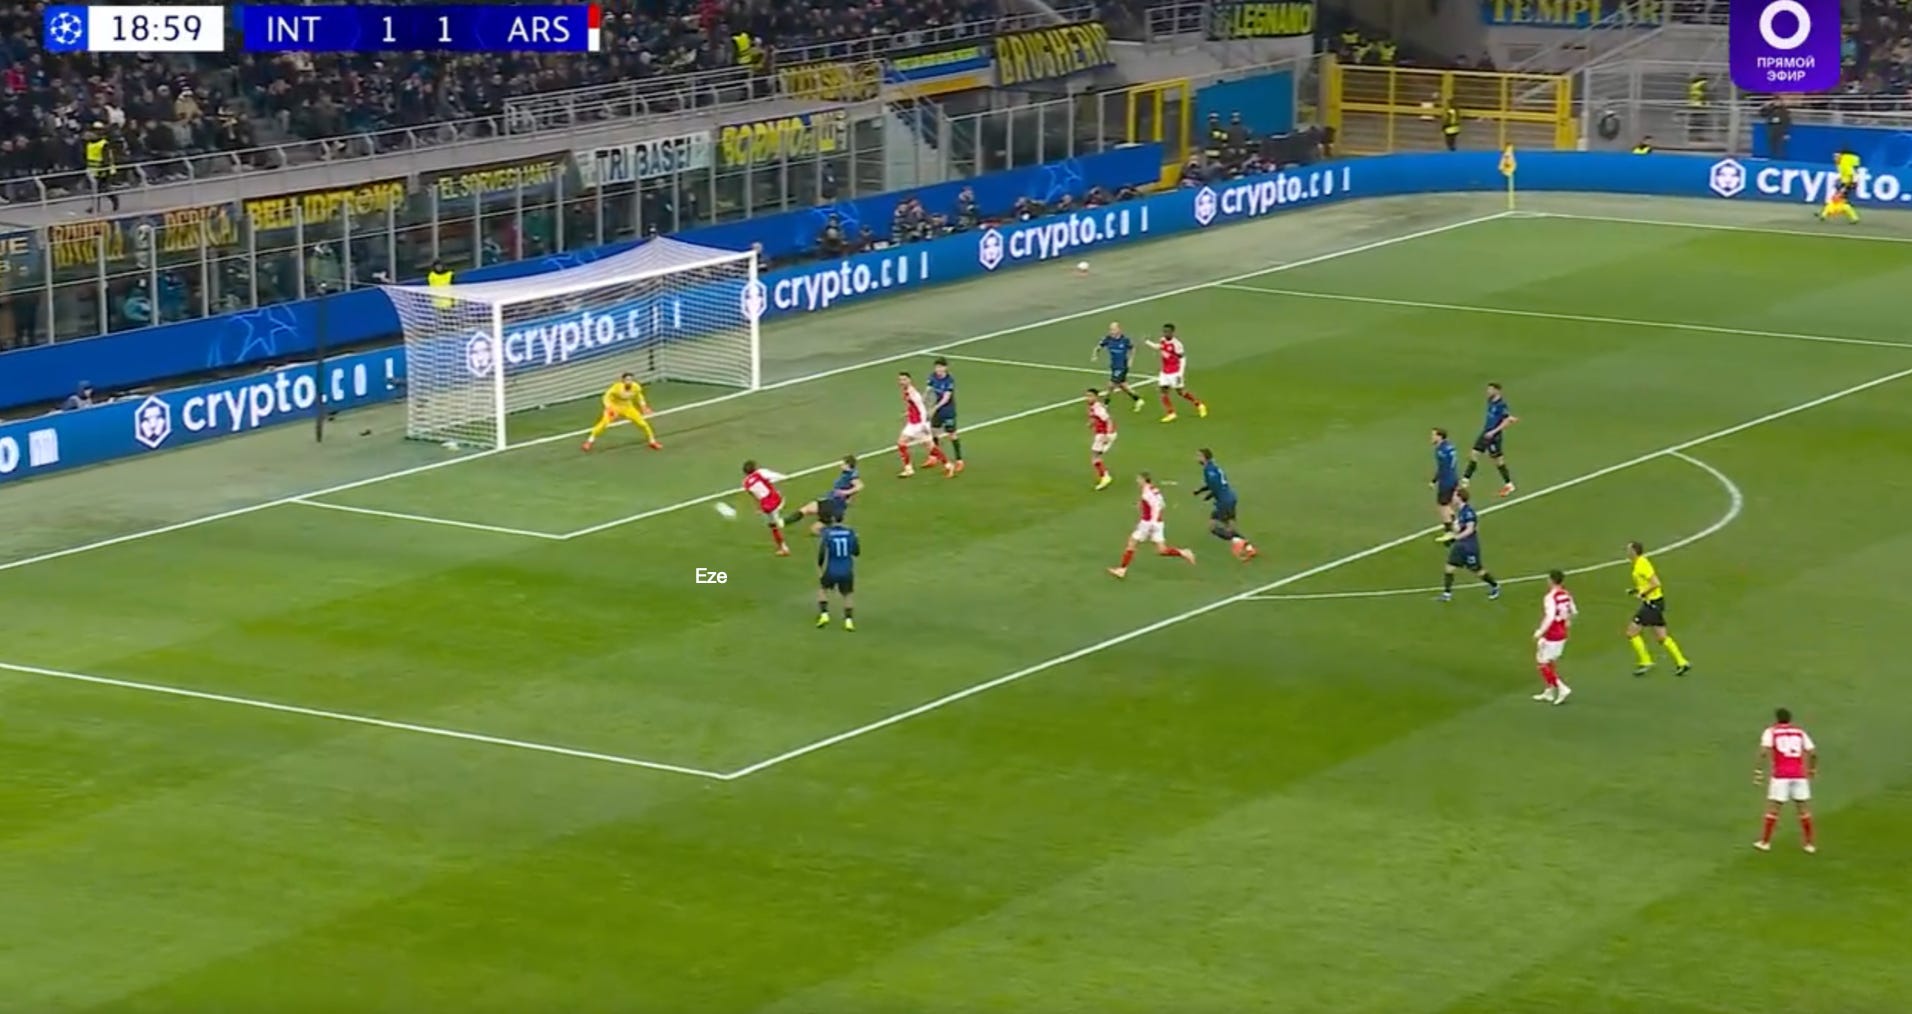
Zubimendi nips in front, with the ball falling to Trossard, whose blocked attempt at goal falls to Eze in a promising position, but he scuffs the shot wide.

Let’s look at one final example, which illustrates the same principles, a 2-3-5 nominal structure. Lautaro Martínez is high and alongside Thuram in this scenario, which creates numerical parity between the two CFs and the Arsenal CB pairing.
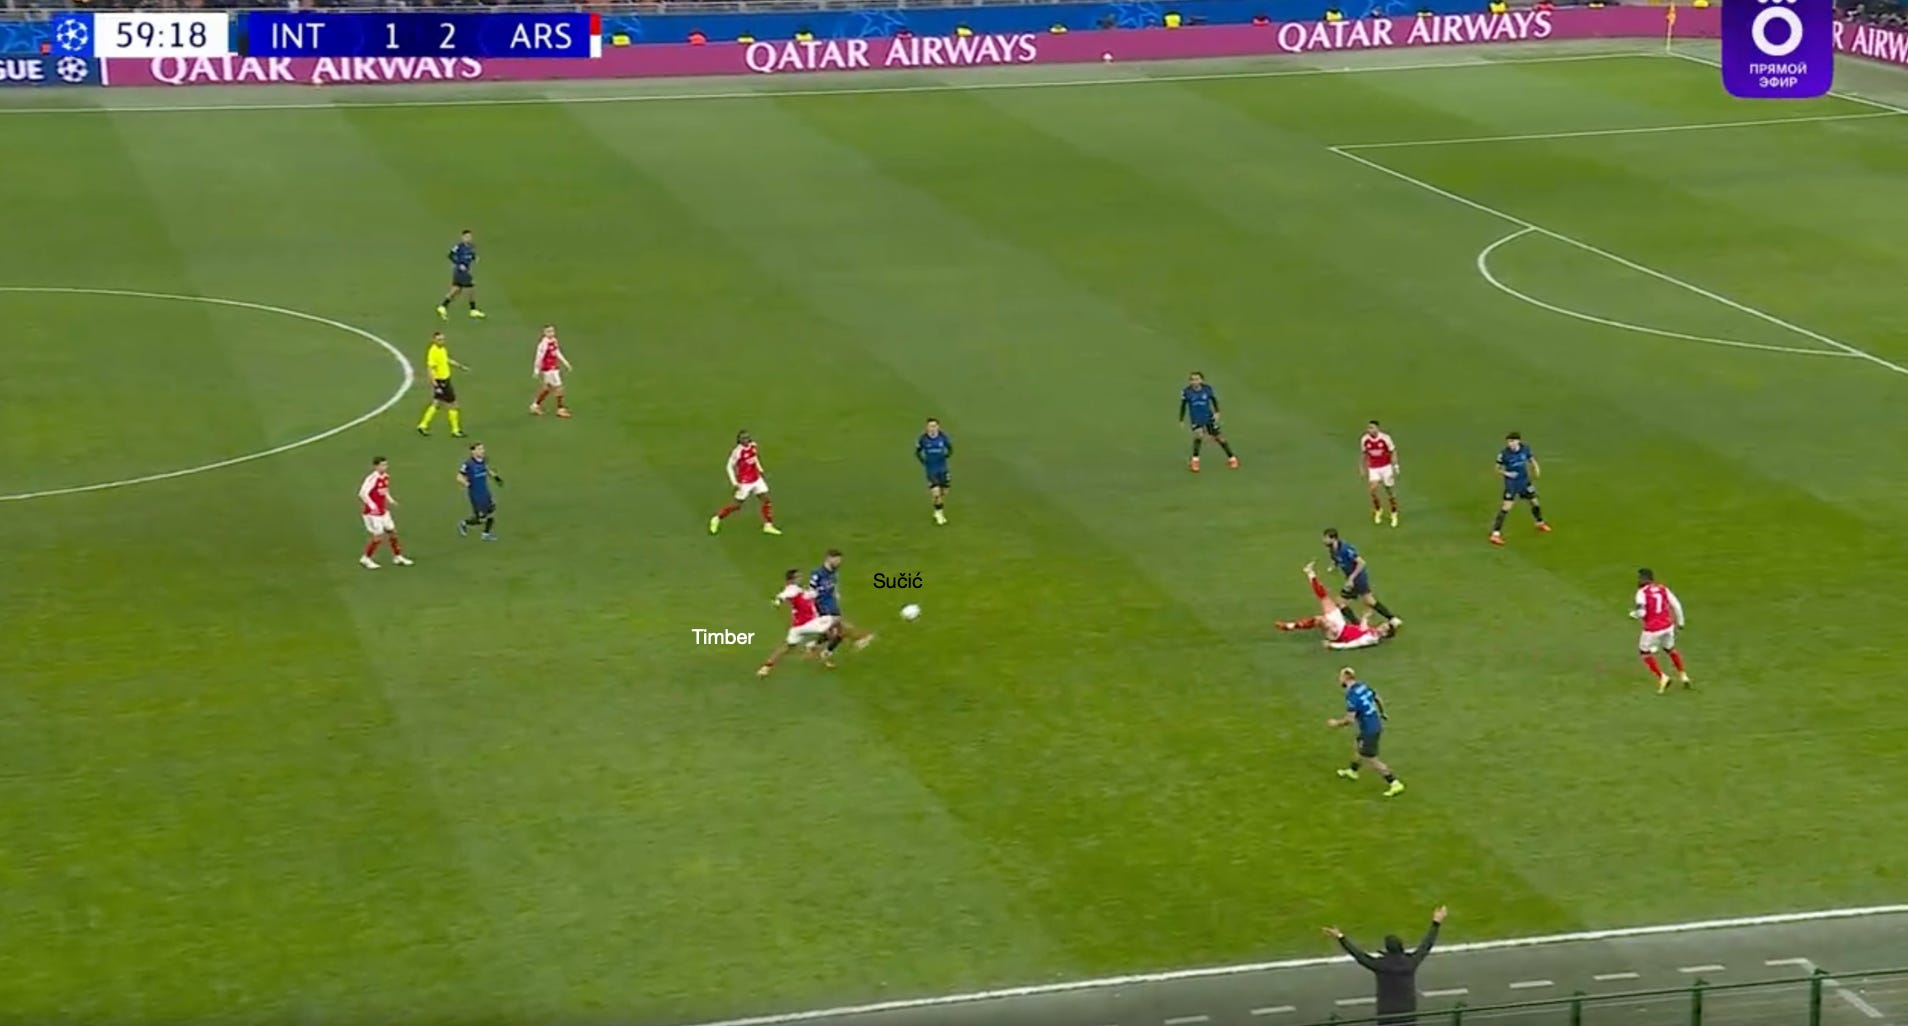
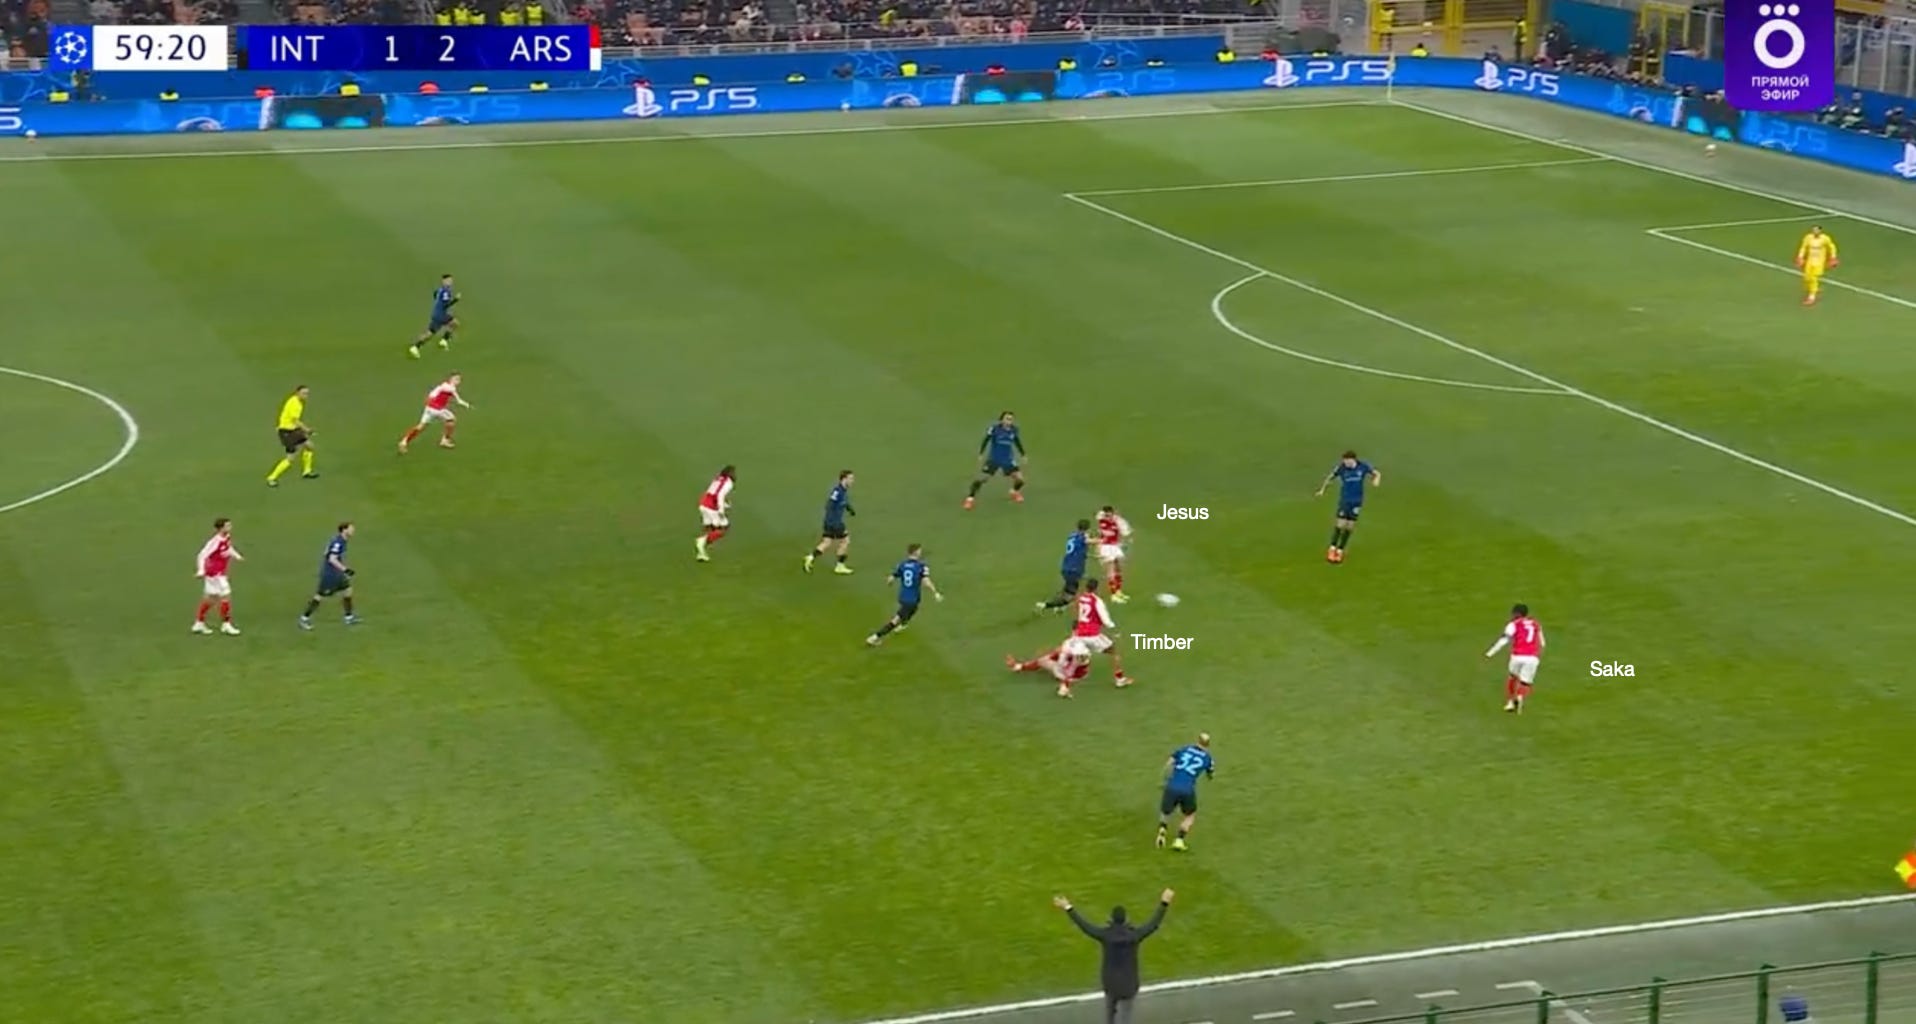
Again, you can see Merino being a nuisance, and with Saka and Jesus both stationed higher to threaten beyond the Inter backline. Despite not winning the initial exchange with Francesco Acerbi, the pressure applied by Merino denies his marker from connecting with the ball cleanly. And this time it’s Timber who gets there ahead of Petar Sučić for the second ball. Timber is behind the man and the ball, so he can keep an eye on both at once, which can’t be said for Sučić. You can also see Saliba, Zubimendi and Eze all behind their man, for the same reasons. This is the salient nuance to consider, as documented in the previous example. Where you position yourself is key. After Timber wins it, we can access Saka via Jesus in space.
It’s also worth mentioning the positioning of the opposite winger (Trossard). They will be tasked with cheating slightly away from the action areas to open up the far side through a quick ball in behind. Naturally, the opposition will gravitate towards the ball, which will leave space free near the underloaded side (in this case, it’s towards the left).
The speed at which you can gain territory via the long ball is a huge benefit. The ability to bypass most of the pitch and create a physically demanding contest suits us. Obviously, the three examples I’ve shown in this piece all end with Arsenal winning the final loose ball.
Unsurprisingly, though, there are generally many times when we don’t control the situation. Ultimately, with the ball in the air, there is a huge degree of randomness in play. The ball can fall anywhere. All we can do is give ourselves the best chance of harnessing randomness.
However, losing the ball isn’t always a bad thing. The beauty of the long ball towards the flank is that even if the opposition manages to collect the ball, they aren’t in an optimum shape to progress play, thereby allowing us to press immeditley since we’ve got all of our players within close proximity.
There is a huge element of the press in mind when going long, since forcing turnovers is one of the best ways to create chances. This is why it’s not a major issue if the long ball from Raya bypasses everyone, since we can quickly implement our high pressing structure at the goal kick.
You can see examples of us adopting these principles in every fixture; however, Spurs away in the 2024/2025 season is a great game to revisit if you are interested.
My final point focuses on Merino and Havertz.
Why are these two so strong in these situations, which consistently allows those nearby to win loose balls?
Both are tall
Both are fantastic in the air
Both are great at winning the first flick on
Even if they lose the initial exchange, both are great at stressing their marker, thereby increasing the odds of winning the loose ball.
Fantastic read. Love the overall 'simplicity' of the tactic and you've done really well to break down the details that give us the best chance of it working in our favour.
Brilliant breakdown of how positioning behind both ball and marker creates those crucial second-ball wins. The insight about Zubimendi having less to process because everythng's in front of him is exactly the type of positional awarenesss that separates elite midfielders. I've noticed in my own coaching sessions that teaching players to "see both" is one fo the hardest concepts, but when it clicks the impact on duels is massive.